Thursday, October 4, 2012

DIY ~ Natural Fall Wreath

I am about to show you the easiest DIY project ever. You ready for this?


I was going to for a classy-colorful-natural vibe for the front door and porch this year.

Here's what you'll need for this Fall monogram wreath:

  • Grapevine wreath (Michaels)
  • Floral "picks" (Michaels - on clearance, hooray!)
  • Garland (Michaels - on clearance)
  • Tall wood letter (mine's from Hobby Lobby, about 10" high)
  • Jute twine (from the hardware store)
  • Hot glue (if you're a dirty cheater like me)
I whipped through this project so quickly, I didn't actually take any photos!

First, cut the garland to desired size and wrap it into the grapevine wreath. My garland had some floral wire on it so I used the wire to attach it more securely to the wreath. The floral pick had a little fake pumpkin and leaves on it, along with some light-colored berries. I cut them off of the pick and worked them into the wreath also.

Last but not least - and my absolute favorite part - I took the twine and wrapped it around the letter. It's times like this that I wish my last name started with an "I," or a "C," or some other easy-to-wrap letter! (I had a flashback to a similar never-ending yarn wreath-wrapping episode last Fall) Since I was doing this while watching tv, I spent most of the commercial time giving Ben dirty looks because his last name, the one that starts with the letter "B," is so flippin' difficult to wrap! (Love you, babe!) I cheated and ended up using my hot glue gun to get some of it to stay. Shhh!

I used the twine to secure the letter to the wreath itself, and then guess what? DONE. Minus the letter-wrapping, this was at most a 10-minute project. And a close-up again, just for kicks:


Here's how it looks on the front door. It adds a little bit of subtle brightness and texture to the red house-black door combo. You'll get to see a zoomed-out photo of the entire porch in a bit!


I love this wreath! With some pretty blooming mums in pots and pails on the front porch, it truly means that Fall is here. Not going to lie, sometimes I open the front door so I can look at it and it makes me smile. :)


post signature

Ps:
If you're strapped but want your own fall berry wreath, I'm moving - so I'm selling my wreath to make room for more awesome things to come.
Hope it can go to a good home!


Linked up at:
TDC Before and After HouseofHepworths   Liz Marie Blog

Monday, August 27, 2012

Mood Board: That Brown Sofa

I would LOVE to know how to style a room with builder-fresh beige walls and a brown sofa. And, based on the search terms that are bringing so many of you to my humble little house blog, so would you!

The brown sofa has continued to be a challenge because it can make this already-small room look even smaller. The "brown sofa room" is the one I just can't seem to figure out, no matter what I try. But lately, Pinterest has stirred up a few ideas... which I've pinned on my Brown Sofa Pinterest board.

West Elm and World Market gave me the inspiration for this mood board. I normally make mistakes on the side of too much color, too much of the wrong colors, or forget to include texture. This one balances out the white molding, white wooden blinds, and white frames. And since most of it is neutral, maybe I won't blow so much money on a colorific rug I'll get tired of looking at in a few months. Instead, I brought in a few color accents in the form of accessories, an art which I am still learning.

This mood board incorporates a lot of the pieces I already own, including a pair of lovelies, Cute-as-a-button Erin chairs from World Market. You'll also see dark woods, a textured jute rug, and some metal accents in the lamp and curtain rods. I softened up the look a little with a throw and some baskets. The jury's still out on the artwork that should go above the sofa... for me, I'm thinking a six-panel frame wall of outdoor lamps and light fixtures around town ('cause I love lamp.). I've been wandering the streets in our vacation destinations taking pictures of old painted brick walls and industrial-looking awning lighting. That might just work!


Source list coming soon.

Meanwhile, check out the nursery mood board I made yesterday.
Enjoy!

9/9/2012: Update --! Kate at Centsational Girl just wrote an amazing post on decorating with a brown sofa, here, on her Better Homes and Gardens blog.

post signature


I linked up at:
Home Stories A2Z   Too Much Time On My Hands  

Saturday, August 25, 2012

Nursery Mood Board

Guess what?? I'm gonna be an aunt!!

Yep, these two are having a baby!


They're going to be the most fun parents ever... I'm positive. Aren't they cute??

And did I mention we found out in a card?! (another story for another day)


The Mood Board
A lil' nugget is probably a little more down the road for me and Ben, so I thought I'd have fun making a nursery mood board that is uniquely Jaz & JC. I chose the Feria Sevilla print and worked it out from there. The wall color I selected is a calming, soothing green (however, since JC's soccer team's rival color is green, this might not fly. "His" colors are red and yellow... I tried!). I liked paint colors Central Park and Landscape (green) by Benjamin Moore.

And the rug? Well, you know I adore this rug, but since it is called the Andalusia rug and we're adding some Spanish influence, this was completely meant to be. The pillow is an Etsy find, made with textiles from Spain.


Source list:
Hot air balloon mobile - Etsy | Giraffe - Etsy | Crib - Target | Nightstand - West Elm | Lamp - West Elm | Feria Sevilla Print - Ebay | Hedgehog bookends - PBKids | Pillow - Etsy | Nursery chair - Pottery Barn | Yellow Andalusia rug - West Elm


post signature

Linked up at:
Liz Marie Blog


Monday, July 2, 2012

How To: Easy Faux Zinc Letters


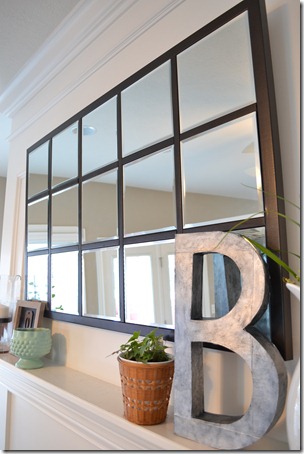
Hey guys! I’m really excited to show you my latest how-to today, the easy faux zinc letter (emphasis on EASY!). Remember the letter “B” on my mantel in the Pottery Barn mirror knock-off tutorial?
Easy Faux Zinc Letter

mirror   
Well, I made that letter “B” out of stuff I had laying around the house. Recycling, actually.
It’s cereal boxes!
I was super lazy efficient about making this, no glue or paper mache required. Yes, you can find cardboard letters like this at Jo-Ann’s. Their design of the letter B looked too much like a number 8 to me so I decided to create my own.

I got so involved in this quickie project that I forgot to take progress photos – oops! This took me only an hour from start to finish. It’s the perfect TV-watching craft.

First, I sketched out two “B”s on the back of some cereal boxes. I used two cereal boxes for this, making sure that the unprinted side of the cardboard was facing out on every side. To make it three-dimensional, I cut the remaining cardboard into 2” strips.

Now. If you’re following along at home, get out your painter’s tape. It was a little pain-staking, but I taped up the letter so that the tape on the front of the letter is invisible (tape inside). The tape’s on the inside of the letter. On the back, I could afford to be less careful and taped this mama-jama up!

Since the letter wanted to roll onto its side, I put a couple of rocks inside to weigh it down. I skipped the full-out papier mache, but if you want, just mix cornstarch & water together and slap some newspaper on that puppy!
DSC_0453 
Go to the store and get yourself some acrylic paint.

Make sure you absolutely absolutely get:
1) Plain black acrylic paint
2) Folk Art “Pearl White” – You’ll find it with the rest of the metallic acrylic paints. It’s a white metallic.
Take the black paint and cover everything. Let it dry.
DSC_0455 DSC_0456

Hooray! Here comes the MAGICAL part. I was like a kid in a candy store when I saw how cool this effect was… who knew that a layer of white metallic + black = metal look??  #WorthTheHype

Take a dry brush, and load sparingly – at first – with the Pearl White paint. Brush it on using straight strokes and dab it on to get the look you want.
DSC_0458
Fun, huh?
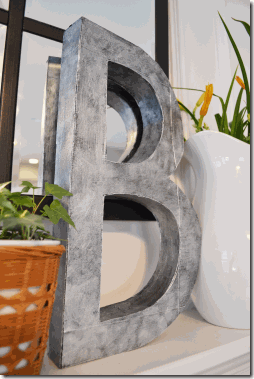
Check out this close-up of the letters. I love how the edges look forged when they pick up the shine from the metallic paint!
BCloseUp

So there you have it – a metal letter art for the cost of 2 bottles of acrylic paint and an hour of your time. Happy painting!
Easy Faux Zinc Letter

I linked up at:
   Liz Marie BlogHome Stories A2Z

Friday, June 15, 2012

Thursday, June 7, 2012

How To: The Pottery Barn Knock-Off Mirror

Can you justify paying $699 for the Eagan mirror from Pottery Barn? Actually, I did the math. With shipping oversize item fees, tax, and plain old shipping, we’re looking at:

Retail price - $699
Tax, 7.5 % - $52.43
Shipping (10%) - $69.90
Oversize item fee - $60
TOTAL COST: $882.33


Holy Mastercard, Batman!!!


I saw some tutorials on my favorite blogs on how to make one of my own, so I did! I mostly followed this one, at The Lettered Cottage (the rest of their house is amazing, too). I made mine a little more polished by adding a thicker frame to my mirror. Here’s the finished product:

House Stuff Works: DIY Pottery Barn Knockoff Mirror

I walked into the project with ZERO knowledge of what to do, what to buy, or how to do it. Through a google search, I found several other tutorials which were helpful, here and here.
The goods:
  • 15 8x8 mirrors (located in the candle section – they’re considered candle holders, and they regularly go on sale for 50% off. Mine were $2.49 each, on sale.)
DSC_0371 
  • Wood
    • (2) 2"’x4’ pieces of particle board (the mirror will measure 44.5 x 27 inches – I used 1/2 thick plywood to cut weight) 
    • 4 brackets to hold two pieces of particle board together (near the hooks at Lowe’s. I used 1”x4” boards for support and nixed brackets altogether)
    • (3) 8 ft. sections of 3/4 inch flat molding (to go in between the mirrors)
    • (2) 8 ft. sections of 1 1/16 inch corner molding (kinda pricey at $10/piece. Other bloggers have said each one only cost them $4, so I must be missing something)
Wood Supplies
  • 1 can Oil-Rubbed Bronze Spray Paint  (you could probably get by with one. Or, use stain for a more natural look)
 DSC_0377
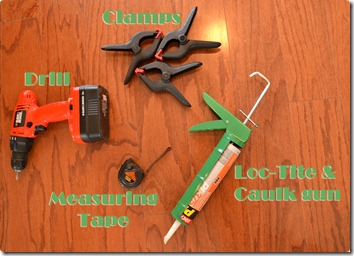
  • Loc-Tite, Liquid Nails, or heavy-duty adhesive (I used construction grade Loc-Tite, available in the adhesive aisle at Lowe’s)
The tools:
  • Caulk gun
  • Miter saw
  • Jig saw or circular saw
  • Tape measure
  • Clamps
  • Personal Protective Eqiupment! (Loss of eyes and hearing is permanent!)
DSC_0378  DSC_0373

DSC_0376

tools
If you’re going to make this mirror yourself, make sure to research the other blogs I mentioned and get detailed instructions. In a nutshell, you’re going to:

1. Cut the plywood, corner molding, and flat molding to size.
Allow for 8 inches, even though most of your mirrors may not actually measure exactly 8 inches square. You won’t notice it – I promise.

Also, I cut weight by using 1/4 inch plywood. I was worried about warping, so I backed it with a few pieces of 1x4 inch scrap wood, which also doubled as a bracket. You’ll see the 1x4s in the photos below.
The tutorial at The Lettered Cottage gives dimensions, but if you’re more of a visual person and using a thicker frame like I made, then see below.

I really wish I had seen a sketch like this in other instructions… slow ol’ me took a while to engineer this out!
drawing
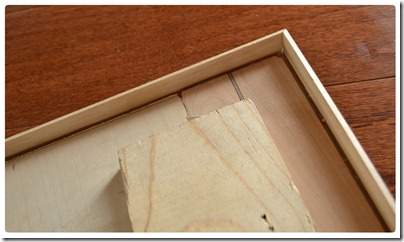
HYere are a few close-ups of how the frame fits in real life. The corner molding will be glued to the top of the mirror backing.
bottomview

bottomview2
Make sure you cut everything the right size before you start gluing…

2. Attach brackets and plywood together to create the proper sized backing for the mirrors.
I used extra 1” x 4” boards instead of brackets, with screws. Don’t worry about the screws sticking out. Here is the back view:
back2
And front view:

front

3. Place the mirrors and molding on the plywood all at once.
This is the moment when you find out if you’ve measured and cut everything correctly!
I used post-it notes to label my mirrors and make sure they went back in the same place (and in the same direction) once I’d decided to put them in a particular spot. I had to do this because I cut the plywood to accommodate the 7 7/8” mirrors, only to find that some were larger and some were smaller, and some were cut completely crookedly. Account for 8 inches and you won’t find yourself in the same awful Tetris-playing mess. placing1

 4. Glue down the wood only.
Glue one edge of the frame at a time, then make sure everything lines up again. This was a super-slow process since I only have three clamps!
I was lucky enough that my corners matched up, but if they don’t, consider using wood filler to eliminate any gaps between the molding.
DSC_0356 If you decide to add the little rosettes (available in the picture-hanging section of the hardware store), glue those down too. I went without.

5. Paint!
…Or stain. I am kind of kicking myself for not staining it. I would’ve liked a dark walnut color, but the oil-rubbed bronze is still really nice. Don’t attach the mirrors until after you paint.

6. Glue the mirrors.
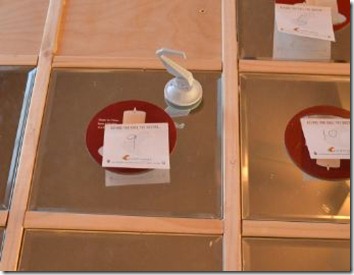
My mirrors had little foam feet on them, so I just put glue on the foam feet and put that down on the plywood. This takes at least a full day to dry. If you need to reposition the mirrors at all, try using a suction cup so you can pick it up safely and easily.
suction

7. Attach hanging hooks to mirror (and wall).
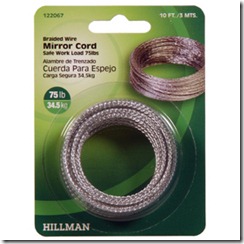
I don’t have any pictures of this, but I used Hillman 50-pound picture hanging wire and screw-in hooks. If I had to do it again, I’d probably use D-rings. At this point, the mirror is super heavy!
hillman
You’d be crazy not to screw this mirror directly into the studs, and that was my challenge – the studs above the fireplace are NOT anywhere centered, so the mirror actually hung really crookedly for a while. Watch out for that.

6. Clean mirrors
I accidentally discovered that painter’s tape is stickier than the adhesive on the mirror stickers. So, I stuck painter’s tape to the stickers and pulled the painter’s tape off, saving me tons of time from scratching and peeling stickers off of mirrors. (Sorry for the dark picture, those windows get crazy bright!)
DSC_0425
To clean the adhesive gunk off of the mirrors, rubbing alcohol and a paper towel works wonders – skip the 409 and Goo-gone.

Other things I wish I knew:
Don’t use a miter box. It is a pain.in.the.behind. Get a miter saw, like the one I borrowed from my friend Emily (Thanks, Em!)

Measure twice, and then measure again. I screwed up the direction of one of my diagonal cuts (arrrgghh!) and had to buy another piece of corner molding, at $10 per section. Expensive mistake!

Don’t sweat it if there are gaps between the mirrors. The mirrors I bought were all 7 7/8” and as much as 3/16” inch smaller than 8 inches. A few were cut unevenly. You’d only notice if you were using them for this project! Don’t trim your plywood or molding – just let it be and hide the spaces when you put them all in place. The dark color of the stain/spray paint should hide the gaps too. I spent at least a few hours making the mistake of cutting them short, and some of my mirrors didn’t fit in the frame well. I know I’ve said this twice now, but it was SO frustrating!

It’s ok if the mirror no longer fits in its little molding “frame.” You can still save it - when you put the mirror into place, make sure it’s flat (and not at an angle) when you glue it down.

Total cost: < $100 (including my expensive cutting mistake, something like $85). Now, if I could convince Ben that I just saved almost $800…!

Ta-da!
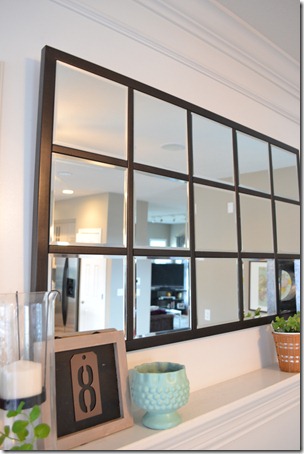
House Stuff Works: DIY Pottery Barn Knockoff Mirror

House Stuff Works: DIY Pottery Barn Knockoff Mirror

DSC_0490

Thanks for stopping by!
Linked at:
IhookedupwithHoHlamespiceTDC Before and After Liz Marie BlogToo Much Time On My Hands

LinkWithin

Related Posts Plugin for WordPress, Blogger...