Sunday, March 1, 2015

Mood Board: Kitchen & Dining Nook

Hello friends! Today I thought I'd share a basic mood board I whipped up for a small space, the kitchen nook. I've been surrounded by some amazing design lately (in some unexpected places) and I thought I'd put that inspiration to good use. This board uses some simple and versatile pieces to add a little bit of fun.


I'm in love with the geometric light fixture, and lately have been digging cozy little dining nooks with banquettes. They just seem so inviting and comfy - much more than a simple place to eat or pay bills.

What features do you love seeing in your favorite (actual or dream-house) dining/living spaces?


post signature

Saturday, November 29, 2014

Gift Guide: For the Ladies

Happy holidays, everyone!

To kick off the gift-giving season, I'm creating some quick gift guides. Today I'm starting with fun ideas for wives, sisters, best friends, moms... any important pretty ladies in your life. Get on over to BartleysRun and check out the details.


post signature

Sunday, December 1, 2013

Holiday Advent Calendar

Hello Friends!

Yes, it has been a while! Don't worry about me - I have been working on some house stuff, but haven't been so good at blogging about it. I'm going to try to post a little more, even if it's just about the little projects.

On Thanksgiving morning, I woke up and wanted to watch the Macy's Thanksgiving Parade. Growing up, it was one of those "why do we have to watch this?" things on TV. But now, as an adult, for as many other exciting things that were on TV at the time, I've realized that this is a tradition in my family. We do it every year. You can expect to wake up and watch the Thanksgiving day parade - it's just how it goes! There were certainly better shows on at the time, like the Modern Family marathon or even some recorded episodes of NCIS, but darn it- you can't mess with tradition!

We haven't really formed any holiday traditions of our own around here - Ben doesn't think he ever really had any. (We'll work on that.) But since I'm describing some of the traditions I've known over the years, one of the others that's important to me is the holiday advent calendar.

As a kid, every December, we pulled out the advent calendar. It's a hanging calendar, with a big felt tree and tiny stuffed velcro-backed fabric ornaments in little pockets. Each night before bed, me and my sister would take turns putting the day's ornament on the tree until it was finally Christmas!

I wanted to bring that tradition back around to my house. I definitely wanted to make, and not buy, one. My strategy was to go with things that I mostly had laying around or in storage.

So here's my mirrored advent calendar!


I used a mirror I hadn't been using, and attached some 3M clear cable-hanging hooks in a grid. For the remaining items, I cut some branches from a tree outside and allowed my advent calendar numbers to overflow onto it. I threw a red bead garland on the mirror for some color.

The numbers are simply white cardstock cut into little flags, and I drew numbers carefully onto each of them. They're hung on the backs with painter's tape. I used baker's twine to hang numbers 1 through 4 on the branches.

I love that the mirror still bounces light around the room, and you can see other Christmas-y areas of the room (like the fireplace) in the reflection. Mirrors don't always photograph so well.


How to do it...
Last year, I bought a ton of ornaments on super-clearance at Kohl's after Christmas. This ended up paying off, because I almost had enough ornaments for all 24 of my days in December!!

I have the ornaments stored in glass vases nearby on the dining table (it does double-duty as a table centerpiece). Every day, starting today, we'll put an ornament on the "calendar" next to the date flag. By the time December 24th rolls around, the entire mirror/calendar will become a display of the cute ornaments I've collected/purchased. Yes, there are a few bunny and dog ornaments for Todd & Toby. ;)


The rest of the vignette you see in the photos is just my little collection of Christmas trees. I'm thankful that I chose neutral colors all around - after all, this is a new tradition!


post signature

...Proudly linked at:

Tatertots & Jello!
Too Much Time On My Hands

Thursday, April 18, 2013

Boston Marathon 2013


On Monday, someone tried to rob us of the joy that marks a lifetime achievement of qualifying for and running in the Boston Marathon. In a few seconds' time, a celebratory running event turned into one having nothing to do with sport or running -- it became about feeling secure on our own turf.

I crossed the finish line about 40 minutes before the two blasts occurred, and was a block parallel from the explosions. Three days later, I'm still not sure how to react and I'm struggling to gather my thoughts. It's impossible to describe the exact way I'm feeling. At first, I was really angry. And I can't stop replaying everything I saw in those moments in slow-motion in my head. I feel sad, and I'm haunted by the photos and videos I've seen in the media coverage. How easily could one of those runners or spectators hurt or killed have been me? It hurts to imagine the pain and not-knowing that families, friends, and the injured themselves are experiencing right now.

I am well and so thankful to come home to my family. I'm taking in every step, every chore, and every conversation like it's a privilege. The one thing I can do is keep running.


Friends, live each moment without regrets. Tell your family how much you love them. Enjoy all of the little things. Go out for a run today, and let's stand up for Boston. No matter where or who you are, let's show this someone that they failed... we're now stronger, prouder, and won't let anyone ever try to take away our joy.


post signature

Tuesday, March 26, 2013

Art Roundup

I just noticed that I've DIY-ed nearly all of the art that's hanging around this place. (I use the term "art" very, very loosely.) I'm still too wishy-washy to commit to some big investment pieces yet... buy one day, sick of it a week later. It's a vicious cycle. I'm choosing mostly art I made - albeit temporary - until I find the ones that speak to me.

So I'm dedicating this post and walking around the house, shooting some photos of the cheap art I have on the walls. And if you want to know how to make your own cheap art, I'll tell you a little more about them. Here we go!

Office

Here's a big poster print I recently purchased from an artist on fab.com for $20 (minus $10 with coupon) and mounted on foam core from Dollar Tree. Not fun fact: I had a little mutual-fault fender bender in the parking lot, so technically that foam core actually cost me more than $1...


Shadow box, Ikea frame. I threw a bunch of fun mementos (and continuously adding) into the frame. So far, a NYC marathon bib, IU vs. Ohio State football tickets, a piece of quartz from the Colorado Rockies, and string from a Mike's Pastry box in Boston. I couldn't bring myself to throw these things away. Proof that I'm a closet hoarder?


This is a Goodwill frame that I re-stained a darker color. The photos are postcard reproductions of antique flower seed packets. I got the postcards from a cute shop called Bayleaf in Boulder, CO. If you're there, you'll want to buy ALL the things! - the store is on Pearl Street.

Entry

Ah, my Chevron  paint chip art! I still love this. It's sitting on a picture ledge in the entry way. For the price of free, you can't beat it.

Here's my very first DIY project: a knock-off of a Crate and Barrel art print. Since Ben & I are all about numbers, this was really fun - it's actually a set of two, but I can't remember where the second one is...! If you look closely, you'll find some hidden numbers that are personal to us (nope, I didn't hide my social security number in it)-- zip codes, addresses, phone numbers.

Mantel
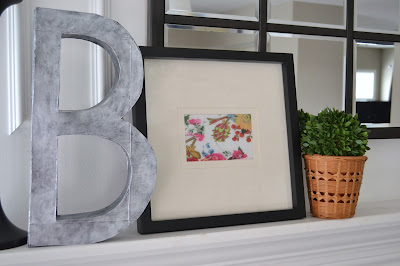
At left is the faux-zinc letter I made out of a recycled cereal box and a little acrylic paint. Next to it is a framed piece of fabric. (Fun fact: the fabric was cut off of my mom-in-law's tunic top that she got in Spain.) It's really pretty fabric!


Another little Goodwill find project. This was a frame that I painted. The "8" tag was from the $1 section at Michaels last Fall.


Behind all of that is my crown masterpiece, the project that took forever and a half but was worth it: my DIY knock-off of the Pottery Barn Eagan mirror. Here it is, whole mantel and all.

Kitchen Drop Spot (...because it doesn't have a name)
Moving on, I have a few things on this little demilune table near the kitchen. At left: a free customizable printable from Wedding Chicks. Then, another Ikea shadow box inspired by Young House Love, filled with some keys and fun mementos. No, that's not a real ring - it's probably worth $3 if I'm lucky but was a part of our love story. :) Note: if you do this yourself, I suggest using Zots and not hot glue. The rock kept falling off! Vase is from Ikea, and the green bowl is from West Elm.


 Dining Nook
The items filling frames in the gallery wall were intended to be temporary, so here's the dining nook.
This, below, is a West Elm napkin glued to an Ikea frame back. I made the knot out of cord used for piping (sewing), from Hobby Lobby. If you do this, tie up the ends of the cord with tape, or else it'll fray. The cord is secured to the napkin with painter's tape (sshh! no one else EVER know!)


The full gallery wall, starting clockwise from 1 o'clock:
1) "B" Monogram printable, another free customizable printable from Wedding Chicks. Thrifted frame with a scrap fabric-covered mat.
2) Watercolor painting. Watercoloring is fun! I made this gradient painting in about 2 minutes. A close-up is below. This is an Ikea frame.
3) Ampersand on canvas. Painter's tape + grey paint.
4) Bloomington run map. I actually ran a route that traced heart shape around Bloomington. Don't recommend - who knows what seedy parts of town you'll end up in!
5) Ikea tree print. Black and white tree "scribble" art. You can't see it anyway, and unfortunately, it's no longer sold at stores.
6) Pre-made black and white nature print. Purchased at Garden Ridge circa 2008. A "1" on the exciting scale.


Bathroom
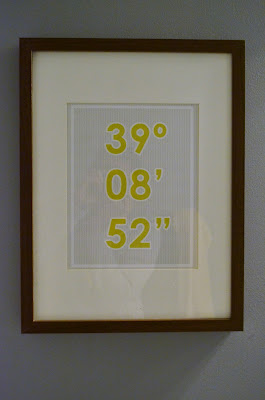
Lattitude printable by yours truly. The background is... herringbone!! Created in Photoshop, printed at home on cardstock, and placed in an odd-dimensioned Ikea Ribba frame.

Bedroom
This is another Ikea Ribba frame, this image is the inside of a VivoBarefoot shoe box. The inside of the box is so creative! (Sorry for the glare)

For about three years, I've been begging Ben to let me buy a new North Face jacket. Well, I finally got my wish in December and then noticed that the bag was perfect for us! I have yet to iron out the creases, but because the bag features a mountain (helloooo- we love Colorado!!), and "Never Stop Exploring" is such a great mantra, I had to be a weirdo and frame the bag. I framed a shoe box, so stranger things have happened around here.


post signature

Friday, March 1, 2013

Free Printable - Latitude Artwork

In keeping with my make-it-short-and-sweet mentality of blog posting, I wanted to share another recent artwork update in the house. Today you're looking at the newest artwork change in the guest bathroom upstairs.


Previously, I put a bird on it. The bright magenta bird packed too big of a punch, and I made the executive decision to take this bathroom to a more put-together and clean color palette. Enter grey and yellow.
The bathroom is also rocking this West Elm bath mat in navy blue, plus these fun Nate Berkus towels. Together, they give this space what I'll call a modern-nautical vibe:
Fez Bath Mat, 23Nate Berkus™ Ikat Link Bath Towel
I decided to make a little bit of artwork. I did it in Photoshop, and got the background of my print to echo the herringbone design of the bath mat. A little tonal grey-on-grey never hurt anyone. :)


I'll switch out the strong black frame for a wood one next to continue with the nautical theme.
Up close -- can you see the herringbone? Love.


But wait, I made a version so you can make your own personal one (easily) too!


First a shameless plug: if you use this artwork or like what you see, please Follow Me!

Now. Get yours:
1) Download the Microsoft Word doc here. (Click the link or Right-click and select "Save As")
2) Figure out your home's latitude coordinates. I used this site.
3) Edit the Word document to reflect yours (you can change fonts and colors, too!).

** Image size will print approximately 8"x10"**


These coordinates, with my longitude, put us somewhere near Huntsville, Alabama. If this is your house's location.... double-score.

Voila! Easy, personal, DIY artwork and you didn't break a sweat.

Thanks for stopping by! If you're a fan of free printables, I have some other popular ones you might want to check out here and here.

post signature

Linked up at:
Liz Marie Blog
Too Much Time On My Hands Style By Stephanie Lynn

Wednesday, February 27, 2013

Gallery Wall Update - Third Edition

Why, hello friends! How have you been?

I'm still here. Here, but busy! Since I posted last, I finished my first 50-mile trail ultra marathon! (I'm proud. Firsts are awesome. It was really fun!) Also, we're getting a puppy next weekend -- he's a mini goldendoodle.

By the way, I made two new year's resolutions this year:

1) Shorter, but more frequent blog posts. I'm slowly realizing that each post doesn't have to be a dissertation. I've been posting about our personal, travel, and running adventures on bartleysrun.com. Go see! I do lots of little projects that don't necessarily need a ton of explanation, but are worth sharing, so I will shoot for more photos and less chatter!

2) Change out of my pajamas at least daily. As a remote worker in my 8-to-5 job, my uniform had started to become yoga pants and t-shirts. Or running clothes that I never showered and changed out of after an early-morning run. Don't judge! I've started following some "everyday fashion" blogs and will try to document some of my favorite outfits from time to time, just for fun.

Ah, but don't think nothing's changed around the house! You are about to see the new and improved gallery wall!!


This gallery wall has been through a lot. It's always been DIY, but I'm finding that I'm polishing and filling these frames with images I love and - most importantly - can live with for months. Remember the first go-around? I started with some close-ups of flowers in the neighborhood. Then, the second time, I blew up and printed out a bokeh image of downtown. But it just wasn't right... the colors, the lack of texture, the size of the prints -- all challenges.

I bought some burlap fabric and spray adhesive from Hobby Lobby, glued the fabric to the back of the frame backing, and then spray-adhesived some of my favorite instagram photos right on top of the burlap. Ta-da!


This (above) was the first try. Yikes. I had bought the fabric months earlier and finally got around to this project, but by that time the fabric was really wrinkled. I ironed it (which actually melted and strengthened the spray-adhesive bond) and it straightened right up! Her's the after, a close-up of a few more shots... just for fun.

Todd the Bunny:

Me, Ben, and our friend Tom in Utah last Summer:


A little zoomed out...

Sorry for the glare!

This is a seriously hard room to photograph! I'd love to learn how to use this schmancy camera...

Shadows - running with friends in Boulder, CO.


Ted Jones, the mini goldendoodle.


Texture! Flexibility with the smaller size of artwork! Subtle, but personal art! I'm in love with my gallery wall again. If history's taught us anything, there will be plenty more iterations of the gallery wall to come if when I get antsy.

Ps- I'm working on something new and big... furniture, and finishing out the ever-challenging Fireplace Room-- so many ideas, and so little time!

post signature

LinkWithin

Related Posts Plugin for WordPress, Blogger...